This post prescribes fuel pipelines(from pumping elements to injectors, bleeding recovery pipes from injectors to pump, LDA pipeline and feed provided by priming pump) shall all be disassembled.
Electrical connection to feed pump shall be disconnected.
Accelerator cable shall be disconnected.
Related Contents:
New Holland Electronic Service Tools (CNH EST 9.8 9.7 8.6 engineering Level) CNH Kit Diagnostic Tool
Notice:
In case feed pump replacement is necessary, this shall be supplied pre-set already as spare part.
On the other hand, in case the pump shall be disassembled and
reassembled later on without being repaired it will be necessary to
pr-set it while it is still assembled to the engine and disassemble it
only afterwards.
The following procedure analyses this second hypothesis since it is the more complex.
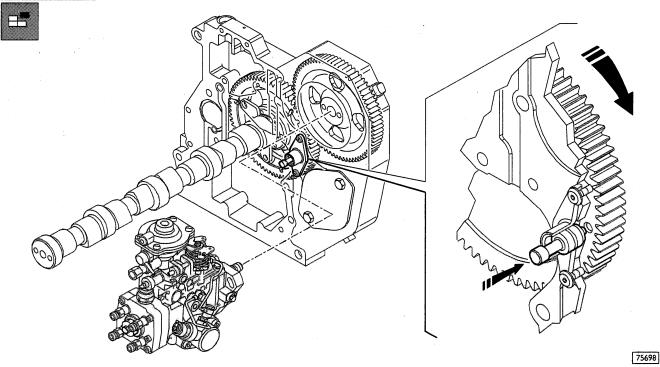
Rotate with caution the flywheel following its own rotation sense to annul the gear slacks and at the same time keep the(→) pin pressed until when this last one is fitting into the port of the camshaft gear.
This way the P15. shall be determined within N.l. cylinder.
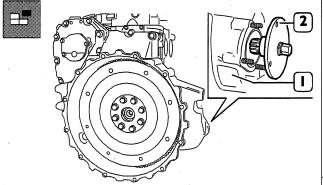
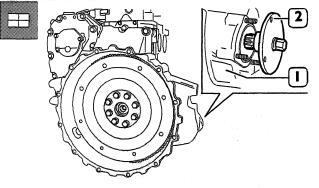
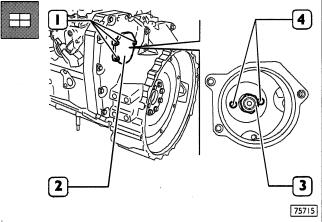
Disassemble the starter from the flywheel box(l) and use the 380000988 tool(2) rotate the flywheel.
Flywheel rotation shall be carried out with extreme caution.The pin charged by excessive shearing stress may get damaged.
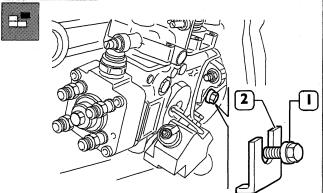
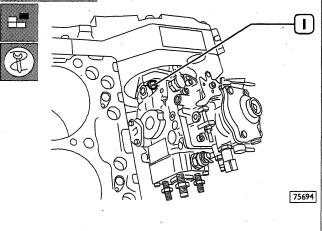
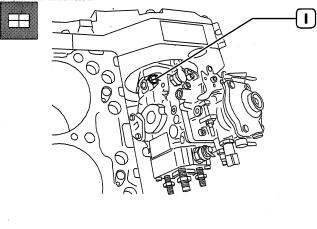
Partially loosen the lateral screw (2) locking the pump shaft and remove the slip washer(2). Absolutely keep the slip washer(it is recommended to fox it with stripe or wire to the pump).
Tighten the lateral screw(1) blocking rotation of the pump shaft.
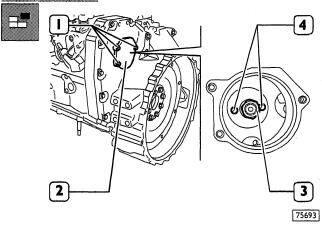
From timing side, remove the cover(2) loosening the screws(I) in order to have access to the union fixing nut (3) to the pump driving gear.
Loosen thefixing nut(3) and remove the relating washer.
From the pump side, loosen the fixing nuts(1) without removing them in order to enable moving the pump backwards using 380000979 extractor.
Assemble the 380000979 extractor throughout the two threaded ports (4. Figure 97) and withdraw the gear from the pump shaft.
Properly hold the feed pump and loosen completely the fxing nuts.
Withdraw the pump from the studs, together with the gasket.
When assembling the feed pump to the engine, it is necessary to meet the PM.S, requirements for the Nl. cylinder.
Use the 380000988 tool(2)n the flywheel box(I) to carry out flywheel rotation and operate using the pin as previously described.
Hold the pump driving gear to avoid interference or crawling during timing gear rotation.
Assemble the pump pre-set in its housing on the engine, fitting the shaft into the gear port(not provided with wrench).
Tighten the fxing nuts(1) locking the pump flange in the slot centre.
The gasket removed during pump disassembly shall not be utilised again.
Always use original spare parts.
On the timing side, throughout the specially appointed port, fit the washer and screw up the fixing nut(3) to the pump shaft. Lock the nut to the 90-95 Nm couple.
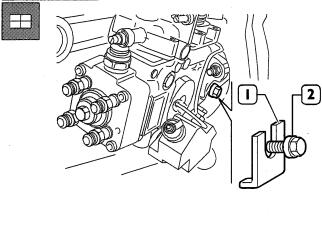
Partially loosen the screw (2) locking the pump shaft rotation and fit the slip washer(1). Tighten the screwfixing above said washer: this way the feed pump shaft is free to rotate.
Assemble the cover(2. Figure 101) including gasket and tighten the screws(I, Figure 10l).
Pull the pin outwards setting the camshaft gear free.
Disassemble the 380000988 tool locking flywheel rotation; place the starter in its housing Connect all pipelines (from pumping elements to injectors, bleeding recovery pipes from injectors to pump, LDA pipeline and feed provided by priming pump).
Connect electrical connections to electro-magnets on the hydraulic head and on KKSB.
In case pump removal has been carried out while the engine was assembled, connect acceleration cable.
If you want to learn more about Heavy Duty Diagnostic Tools , welcome to contact with us: Service@autonumen.com , or you can check on our store: autonumen.com .Thanks!