2023年11月23日星期四

cnh diagnostic interface for New Holland tractor


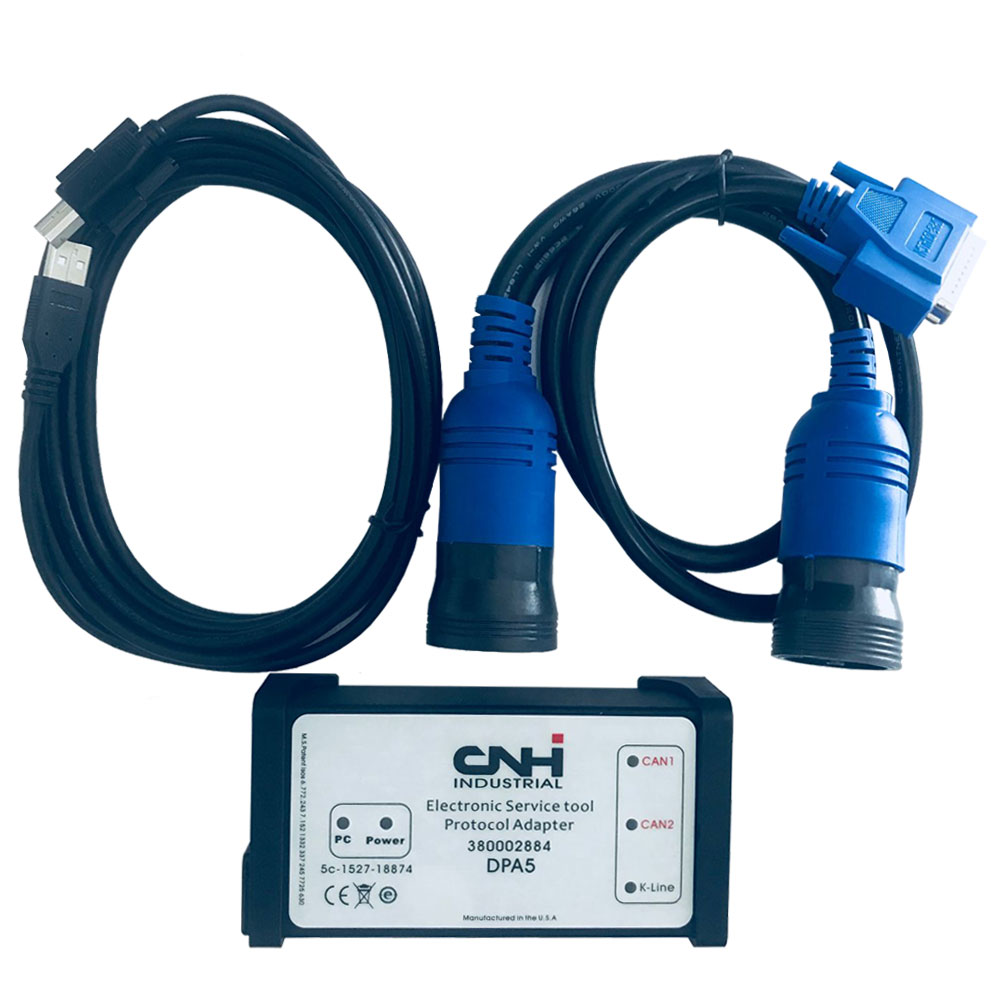
The new holland tractor diagnostic tool is a versatile diagnostic tool specifically designed for CNH (Case New Holland) equipment. It allows users to diagnose, calibrate, and troubleshoot various systems in CNH machinery, including engines, transmissions, and electronic modules. This tool offers Advanced features like ECU programming, parameter adjustments, and fault code clearing, enabling users to maintain and optimize the performance of CNH equipment.New Holland Electronic Service Tools CNH EST DPA 5 Diagnostic Tool With CNH EST 9.8 8.6 Engineering Software.

Functions: 

1.Check status of parameters;

2.Retrieve faults;

3.Run diagnostic tests;

4.Make ECU and parameter programming;

5.Monitor active and logged diagnostics;

6.View and change ECU configuration;

7.View diagnostic procedures and schematics.

8.Troubleshoot problems;

9.Use asist database;

10.Run scope diagnostics;

11.E.A.S.y - additional engine diagnostic and download tool for connection directly to ECU to perform diagnostic, programming and ECU reload by K-Line protocol.

12.CNH Engine Download Tool operates from within the EST program to perform the following engine download operations:

13.Provide Engine Control Unit (ECU) programing update capability;

14.Provide blank ECU initialization and programming capability;

15.Provide ECU programming reassignment for blank and other ECUs;

16.Provide ECU download crash recovery.

Software display:


Porsche is known for producing high-performance and luxury cars that attract car enthusiasts around the world. As a Porsche owner, having the best diagnostic tools is crucial to ensuring optimal performance and longevity of your vehicle. Among the various options available in the market, the Porsche PIWIS 3 diagnostic tool stands out as the ultimate choice for Porsche users.


The Porsche PIWIS 3 diagnostic tool is designed to meet the unique diagnostic needs of Porsche vehicles. It offers advanced features and functionality that enable users to diagnose and resolve any issue accurately and efficiently. Whether you're a professional mechanic or a Porsche enthusiast who enjoys DIY maintenance, this tool is a game-changer.


The Porsche PIWIS 3 diagnostic tool offers a user-friendly interface that makes the diagnostic process easy for both novice and experienced users. The tool provides clear and concise instructions, allowing you to quickly identify and correct any issues. It also provides real-time data and real-time sensor readings, allowing you to monitor the performance of various vehicle components during operation.


SUPER MB STAR C6 DOIP WIFI Diagnostic Tool is a cutting-edge diagnostic tool designed for Mercedes-Benz vehicles. With its advanced features and capabilities, it allows users to efficiently diagnose and troubleshoot various vehicle systems. This tool provides comprehensive diagnostics, programming, and coding functions, making it an essential tool for professional mechanics and Mercedes-Benz enthusiasts.


The john deere service advisor edl v3 is a powerful diagnostic tool that caters specifically to John Deere equipment. It provides comprehensive diagnostics, testing, and maintenance functions for John Deere agricultural and construction machinery. This tool enables users to accurately diagnose issues, perform software updates , and optimize the performance of John Deere equipment.


For those dealing with trailer ABS systems, the wabco trailer abs diagnostic tool is a must-have. This tool is designed to diagnose and troubleshoot ABS-related issues in trailers. It offers real-time data, fault code reading, and advanced diagnostics, ensuring safe and efficient operation of trailer braking systems. With its user-friendly interface and comprehensive features, it simplifies the process of diagnosing and repairing trailer ABS problems.


In summary, these diagnostic tools mentioned above are essential for efficient and accurate vehicle diagnostics and maintenance. Whether it's for Mercedes-Benz vehicles, John Deere equipment, trailer ABS systems, or CNH machinery, these tools provide the necessary capabilities to ensure optimal performance and reliability.


All in all, as a Porsche user, the best choice for your diagnostic needs is undoubtedly the Porsche PIWIS 3 diagnostic tool. Its advanced features, compatibility with all Porsche models, user-friendly interface and coding capabilities make it the ultimate tool for diagnosing and maintaining your Porsche vehicle.

2023年9月5日星期二

JCB ServiceMaster 4 is Empowering Agricultural Machinery and Engine Diagnostics

In the realm of agricultural machinery and engines, efficiency and reliability are paramount. JCB Diagnostic Electronic Service Tool, a cutting-edge diagnostic software, has emerged as a game-changer in the industry. Boasting an intuitive interface and a plethora of features, this software facilitates troubleshooting, maintenance, and fault detection, ultimately enhancing professionalism and instilling trust among customers. In this article, we will delve into the various aspects of JCB ServiceMaster 4, including its features, supported models, system requirements, and hardware compatibility.


Software Information:

JCB ServiceMaster 4 is the latest version of the diagnostic software, released in March 2023. With a file size of 19.7 GB and an installed size of 22.7 GB, it offers comprehensive coverage for JCB agricultural machinery and engines across all regions. The software supports multiple languages, including English, French, German, and Spanish, making it accessible to a wider user base.

Software Features:

The JCB ServiceMaster 4 software encompasses a range of powerful functions that empower users in their diagnostic endeavors. Some of its key features include:


1. Troubleshooting: The software provides a quick and effective fault-finding mechanism, aiding users in identifying and resolving issues promptly.

2. Standard Test Service: Users can perform standard tests to verify maintenance standards and ensure optimal performance of the machinery or engine.

3. Data Viewing and Editing: JCB ServiceMaster 4 allows users to view and edit generated data, enabling them to make necessary adjustments and modifications as required.

4. ECU Flash Files: The software facilitates flashing the Engine Control Unit (ECU) with correct data files, ensuring seamless communication and improved functionality.

5. Failure Detection: With its advanced algorithms, the software efficiently detects failures and malfunctions, enabling expedited troubleshooting and resolution.

6. Configuration Data Management: Users can view and change the configuration data of the machine or engine, ensuring compatibility and customization.

7. Professional Maintenance Verification: The software enables users to verify service standards and ensure adherence to professional maintenance protocols.


JCB ServiceMaster 4 Support Models:

JCB ServiceMaster 4 caters to a wide range of construction, agricultural, waste, and engine models. Some of the supported models include:


1. Construction: Backhoe Loaders, Excavators, Compact Excavators Mini/Midi, Telescopic Handlers, Skid Steer Loaders, Teletruk, Wheeled Loading Shovels, Articulated Dump Trucks, Vibratory Compactors, Rough Terrain Forklifts, Site Dumpers.

2. Agricultural: Fastrac Tractors, Telescopic Handlers, Wheeled Loading Shovels, Telemasters.

3. Waste: Telescopic Handlers, Wheeled Loading Shovels.

4. Engines: JCB Dieselmax Engine, JCB Ecomax Engine, JCB Dieselmax 672 Engine, 430 Dieselmax Engine, JCB Stage V Dieselmax Engine, Kohler TCR Engine, Kohler StageV Engine, among others.

5. Other: Engines, LiveLink, JCB Access, General Generators, Immobilizer.


Computer Requirements:

To ensure smooth operation, JCB ServiceMaster 4 has specific system requirements. These include:


1. Free hard drive space: 50 GB

2. Operating Systems: Windows® 7, 8, 10, and 11 (both 32-bit and 64-bit versions)


Supported Hardware:

JCB ServiceMaster 4 is compatible with various hardware devices, including:


1. JCB Diagnostic Kit (DLA)

2. Nexiq USB Link (Version 1 or 2)

3. DG Technology DPA5

4. Norgone DLA

5. Other RP1210 devices


JCB ServiceMaster 4 stands as a testament to JCB's commitment to providing advanced diagnostic solutions for agricultural machinery and engines. With its user-friendly interface, comprehensive features, and wide-ranging support for models and hardware, this software empowers users to maintain, troubleshoot, and optimize their equipment efficiently. By harnessing the power of JCB ServiceMaster 4, professionals in the industry can enhance their productivity, foster customer trust, and unlock new levels of professionalism and success.

2023年8月22日星期二

Your Ultimate Automotive Diagnostic Tool


In the fast-paced world of automotive repair, having access to accurate and comprehensive diagnostic tools is crucial for every technician. The automotive industry is constantly evolving, with new models and technologies being introduced regularly. To keep up with these advancements and provide top-notch service to customers, automotive technicians need reliable diagnostic solutions that can cater to their specific needs.

Introducing Mitchell OnDemand, Super MB STAR C6 DOIP, and Porsche Piwis 3 Tester III - powerful diagnostic tools that have become essential for professionals in the field. These tools offer a wide range of features and capabilities, enabling technicians to diagnose, repair, and program vehicles efficiently. Let's take a closer look at each of these solutions and how they can revolutionize your automotive diagnostic processes.

ALLDATA 10.53: The Ultimate Diagnostic and Repair Solution

ALLDATA 10.53 is a powerful software program that covers a wide range of automotive makes and models. It provides technicians with all the information they need to diagnose and repair vehicles efficiently. With a user-friendly interface and an extensive database, ALLDATA 10.53 is a one-stop solution for all your diagnostic and repair needs. Here are some of the key features and contents of ALLDATA 10.53:

1. Diagnosis and Repair: From troubleshooting to step-by-step repair procedures, ALLDATA 10.53 covers it all, ensuring accurate and efficient diagnosis.
2. Diagnostic Trouble Codes (DTC): Get access to comprehensive lists of DTCs for accurate diagnosis, saving time and effort.
3. Extensive Coverage: ALLDATA 10.53 provides detailed information on various vehicle systems, including relays and modules, sensors and switches, engine, cooling, and exhaust systems, powertrain management, transmission and drivetrain, brakes and traction control, and much more.
4. Maintenance: Stay on top of routine maintenance tasks and schedules for optimal vehicle performance, ensuring the longevity of vehicles.
5. Comprehensive Information: ALLDATA 10.53 covers everything from power and ground distribution to steering and suspension, heating and air conditioning, restraint systems, accessories and optional equipment, body and frame, cruise control, instrument panel, gauges, and warning indicators, lighting and horns, windows and glass, and wiper and washer systems.

Mitchell on Demand: Your Comprehensive Automotive Resource

Mitchell on Demand is another powerful software program that provides technicians with accurate and up-to-date information. It offers a wide range of features and contents that can streamline your diagnostic and repair processes. Here are some of the key features and contents of Mitchell on Demand:

1. Parts and Labour: Access comprehensive databases for parts and labor estimates, enabling accurate cost estimation for repairs.
2. Technical Service Bulletins: Stay updated on the latest service bulletins from manufacturers, ensuring that you have the most up-to-date information at your fingertips.
3. Detailed Diagrams: Visualize the layout and connections of vehicle systems through detailed diagrams, simplifying the troubleshooting and repair processes.
4. System Diagnosis: Understand the process of diagnosing vehicle systems, ensuring accurate and efficient diagnosis.
5. Troubleshooting Tests: Access detailed testing procedures for accurate diagnosis, saving time and effort.
6. Vehicle Identification: Identify vehicles accurately using VIN decoding and vehicle identification techniques, ensuring accurate information for repairs.
7. Technician Safety Information: Stay informed about safety guidelines for technicians, ensuring a safe working environment.

Super MB STAR C6 DOIP: The Mercedes-Benz Diagnostic Solution

Super MB STAR C6 DOIP is a state-of-the-art diagnostic tool designed specifically for Mercedes-Benz cars and trucks. It offers a wide range of features that make it a must-have for Mercedes-Benz technicians. Here are some of the top reasons to invest in Super MB STAR C6 DOIP:

1. DoIP Compatibility: The new SDconnect C6 supports DoIP (Ethernet communication), enabling seamless diagnostics for the latest Mercedes models, ensuring accurate and efficient diagnosis.
2. Stable Wireless Connection: With a built-in WiFi chip, the wireless connection is stable and reliable, ensuring uninterrupted diagnostic processes.
3. Remote Help: Remote assistance is available for efficient troubleshooting, ensuring timely resolution of complex issues.
4. High-Quality Build: Super MB STAR C6 DOIP is waterproof, shockproof, and tamper-proof, ensuring durability and longevity, making it suitable for various working conditions.
5. Advanced Diagnostics: Super MB STAR C6 DOIP supports K line diagnosis, CAN BUS, and UDS diagnose protocol, offering comprehensive diagnostic capabilities.
6. Wide Compatibility: Super MB STAR C6 DOIP supports both 12V cars and 24V trucks, ensuring versatility and compatibility with various Mercedes-Benz vehicles.
7. Additional Software Tools: Super MB STAR C6 DOIP comes with free DTS Monaco & Vediamo, providing advanced diagnostics and programming capabilities, expanding the functionalities of the tool.
8. Military Quick Swap Technology: The connector is designed for 10,000 times plug pulling, ensuring stability and reliability, reducing the risk of connection issues during diagnostics.

Porsche Piwis 3 Tester III: The Porsche Diagnostic Solution

Porsche Piwis 3 Tester III is the latest diagnostic tool for Porsche vehicles. It offers advanced diagnostic capabilities and a range of features that make it a valuable asset for Porsche technicians. Here are some important points to consider about Porsche Piwis 3 Tester III:

1. SSD Protection: The SSD cannot be copied, ensuring the security of the software, protecting valuable information and preventing unauthorized access.
2. Internal Disk Usage: Piwis 3 Software SSD should ONLY be used as an internal disk, never as an external hard drive, to avoid potential damage and ensure optimal performance.
3. Laptop Specifications: For optimal performance, a high-resolution PC with a minimum resolution of 1920×1080 and a minimum of 8GB RAM and I5 CPU is recommended, ensuring smooth operation and quick response times.
4. Ready-to-Use Solution: If you require a complete ready-to-use solution, we offer Piwis 3 with a compatible laptop, ensuring compatibility and ease of use.

Invest in Cutting-Edge Diagnostic Solutions

With their user-friendly interfaces, extensive databases, and advanced diagnostic capabilities, ALLDATA 10.53, Mitchell on Demand, Super MB STAR C6 DOIP, and Porsche Piwis 3 Tester III are the ultimate automotive diagnostic solutions. These tools ensure accurate and efficient diagnosis, saving time and effort, and ultimately enhancing the quality of your automotive repair services.

In the fast-paced world of automotive repair, staying up-to-date with the latest diagnostic technologies is crucial. By investing in these cutting-edge tools, you can take your automotive repair business to new heights and provide exceptional service to your customers. Don't miss out on the opportunity to streamline your diagnostic processes and stay ahead of the competition. Choose your ultimate automotive diagnostic solution today and revolutionize your automotive repair business.

2023年8月9日星期三

JCB ServiceMaster diagnostic software DLA diagnostic adapter configuration


This is a how to guide on JCB ServiceMaster diagnostic tool DLA diagnostic adapter configuration.

Related Contents:
2023 JCB ServiceMaster 4 Free Download for Win 7/Win 8/Win 10

Procedures:
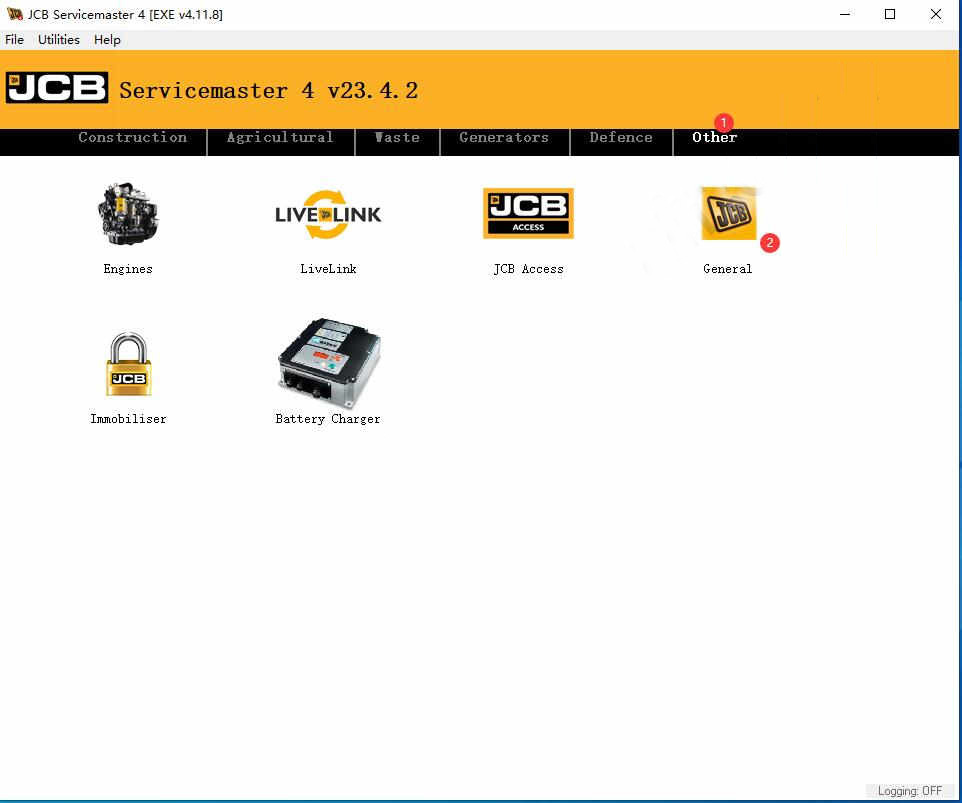
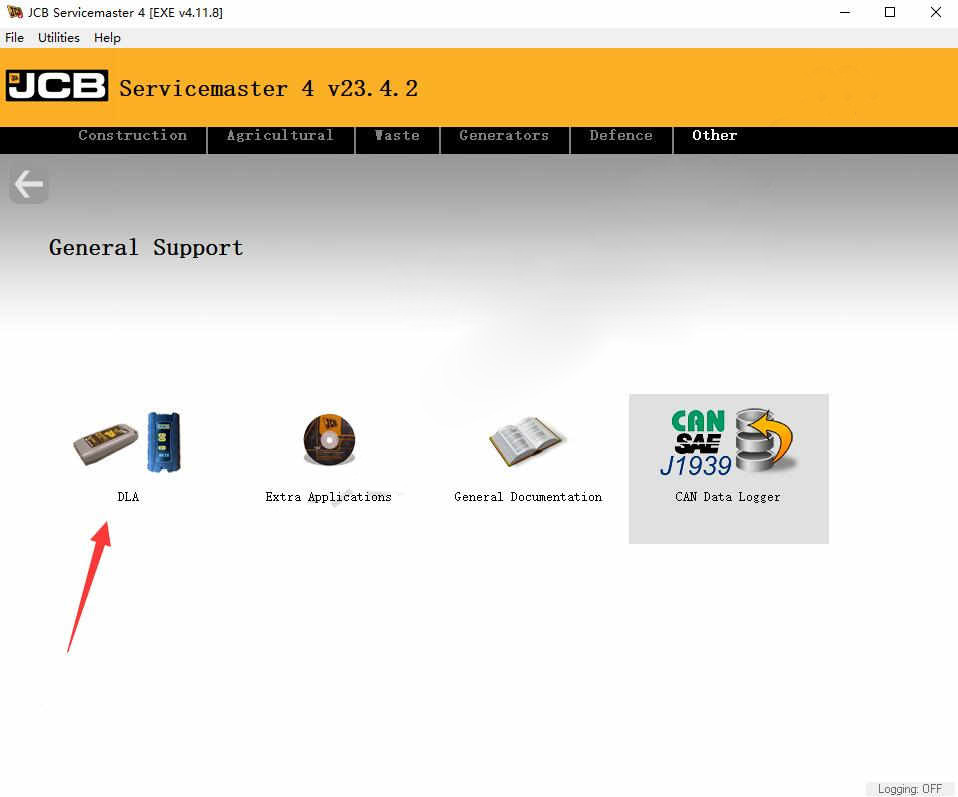
1 Start the Servicemaster software on your laptop computer.
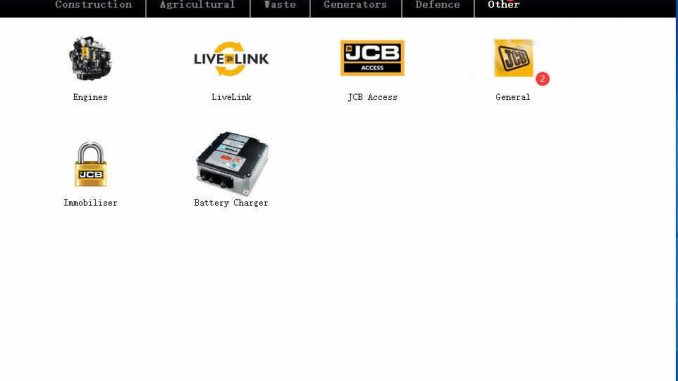
2 Click the ‘Other’ tab.
3 Click on the ‘General’ icon.

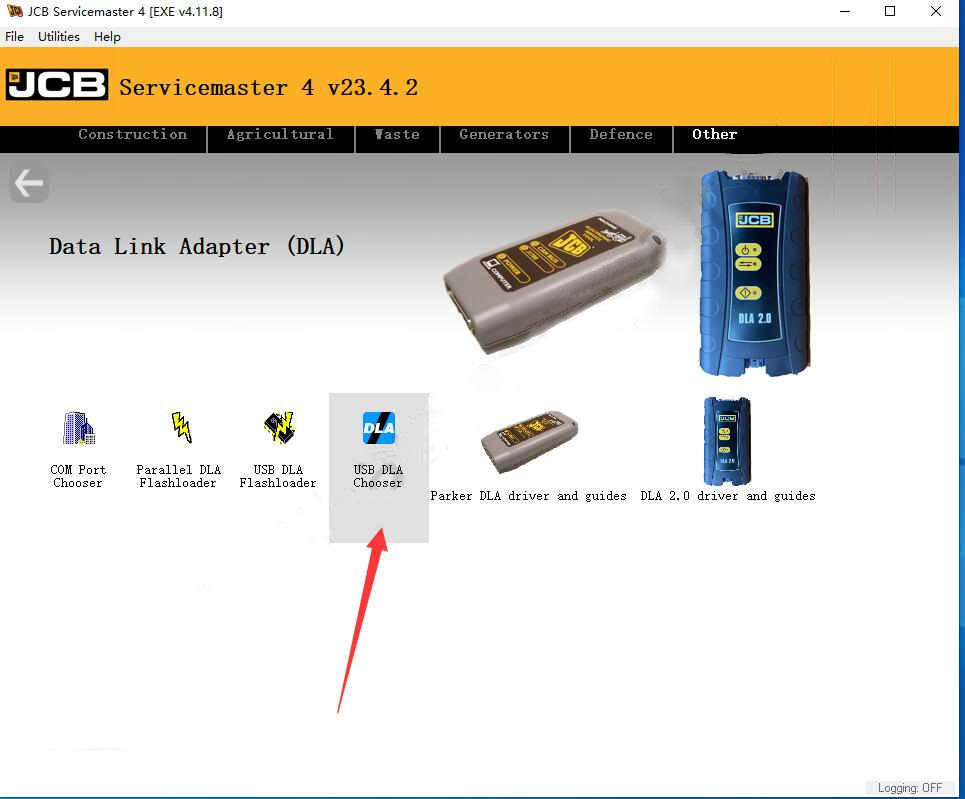
4 Click on the ‘DLA’ icon.

5 Select “USB DLA Chooser”

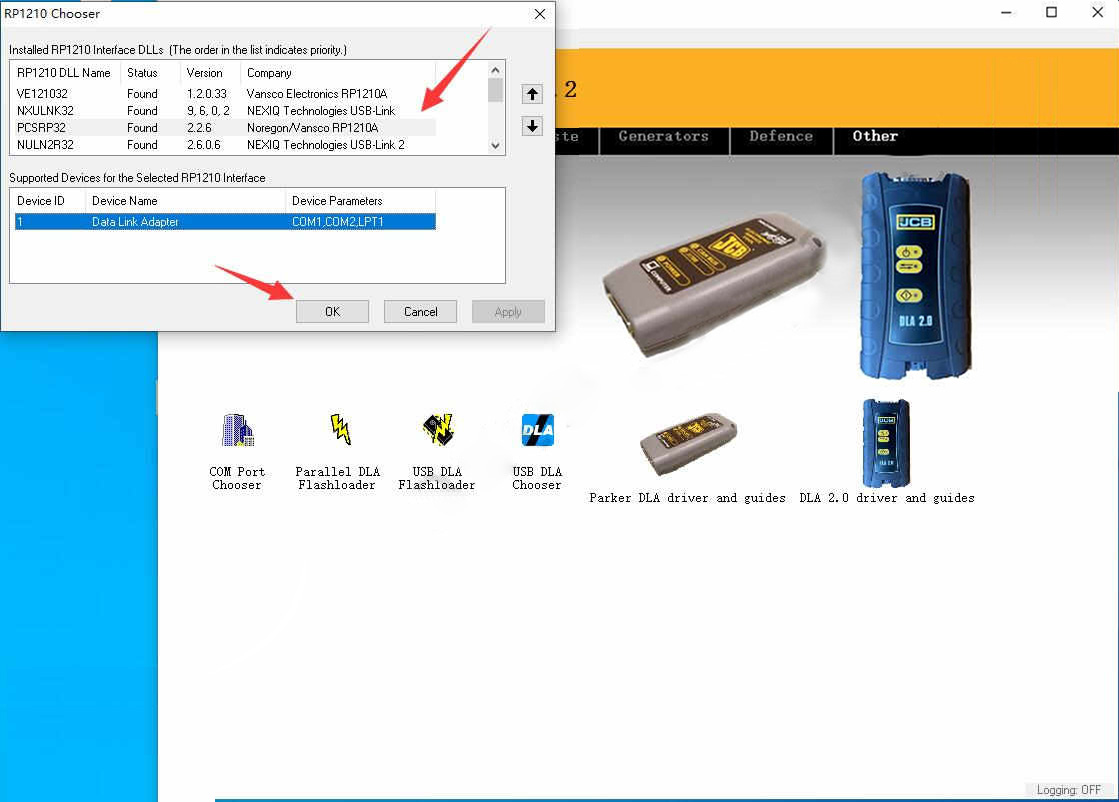
6 Select installed RP1210 interface DLLs (The order in the list indicate priority)

Click “Up” arrow to move your interface to top order

Then click “OK”

More topics for JCB machine,please refer to:JCB Machine Trouble Repair.

2023年5月30日星期二

Correct operation after Volvo 88890300 Vocom Interface PTT 1.12 software update

Volvo 88890300 Vocom Interface is a diagnostic application that covers the whole repair process through the use of plug-ins. With Volvo 88890300 Vocom Interface you can diagnose, test, calibrate, and program a product (a vehicle, engine, or a machine). Volvo 88890300 Vocom Interface also provides functions for updating the tool, communication with the product, and other external applications. Users can setup plug-ins, user authorizations, and available languages as they want.

For our Volvo 88890300 Vocom Interface we offer PTT 1.12 Or PTT 2.8.150 software version
For PTT 1.12 you should install software yourself , and for PTT2.8.150 version software we will install software well on hard disk

There have customers asked that if he updated the PTT 1.12 version software not working , then how to do next ?
The best way is that you should change the other win7 system re-install the software again , then can use it.

 If you want to learn more about Heavy Duty Diagnostic Tools , welcome to contact with us: Service@autonumen.com , or you can check on our store: autonumen.com .Thanks!


2023年5月24日星期三

How to disassemble and assemble New Holland LW 130.B wheel loader rotary feed pump

This post prescribes fuel pipelines(from pumping elements to injectors, bleeding recovery pipes from injectors to pump, LDA pipeline and feed provided by priming pump) shall all be disassembled.

Electrical connection to feed pump shall be disconnected.
Accelerator cable shall be disconnected.

Related Contents: 

New Holland Electronic Service Tools (CNH EST 9.8 9.7 8.6 engineering Level) CNH Kit Diagnostic Tool

Notice:
In case feed pump replacement is necessary, this shall be supplied pre-set already as spare part.
On the other hand, in case the pump shall be disassembled and reassembled later on without being repaired it will be necessary to pr-set it while it is still assembled to the engine and disassemble it only afterwards.

The following procedure analyses this second hypothesis since it is the more complex.

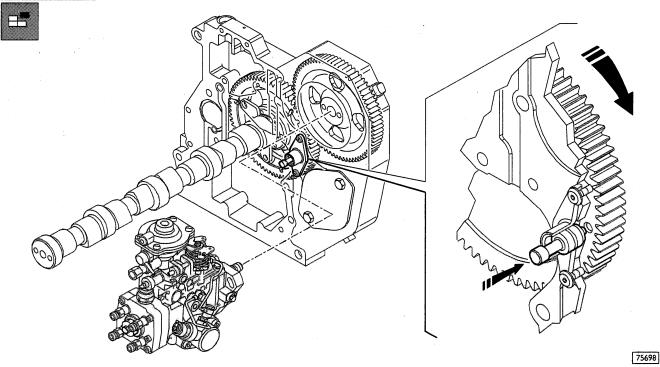
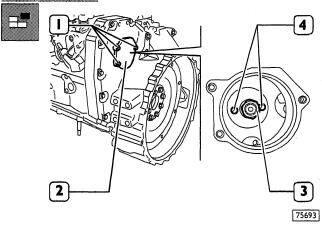
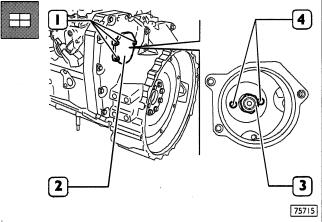
Rotate with caution the flywheel following its own rotation sense to annul the gear slacks and at the same time keep the(→) pin pressed until when this last one is fitting into the port of the camshaft gear.

This way the P15. shall be determined within N.l. cylinder.

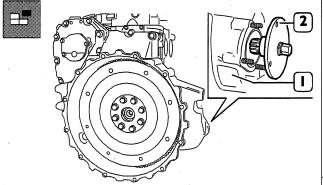
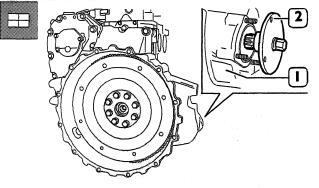
Disassemble the starter from the flywheel box(l) and use the 380000988 tool(2) rotate the flywheel.

Flywheel rotation shall be carried out with extreme caution.The pin charged by excessive shearing stress may get damaged.

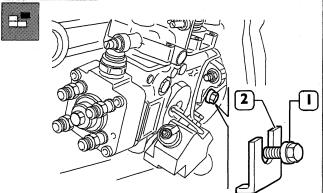
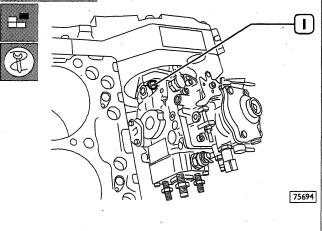
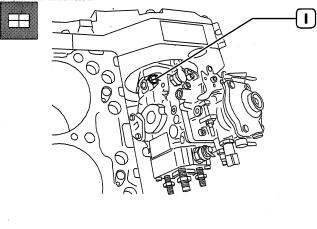
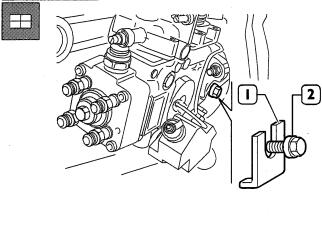
Partially loosen the lateral screw (2) locking the pump shaft and remove the slip washer(2). Absolutely keep the slip washer(it is recommended to fox it with stripe or wire to the pump).

Tighten the lateral screw(1) blocking rotation of the pump shaft.

From timing side, remove the cover(2) loosening the screws(I) in order to have access to the union fixing nut (3) to the pump driving gear.

Loosen thefixing nut(3) and remove the relating washer.

From the pump side, loosen the fixing nuts(1) without removing them in order to enable moving the pump backwards using 380000979 extractor.

Assemble the 380000979 extractor throughout the two threaded ports (4. Figure 97) and withdraw the gear from the pump shaft.

Properly hold the feed pump and loosen completely the fxing nuts.

Withdraw the pump from the studs, together with the gasket.

When assembling the feed pump to the engine, it is necessary to meet the PM.S, requirements for the Nl. cylinder.

Use the 380000988 tool(2)n the flywheel box(I) to carry out flywheel rotation and operate using the pin as previously described.

Hold the pump driving gear to avoid interference or crawling during timing gear rotation.

Assemble the pump pre-set in its housing on the engine, fitting the shaft into the gear port(not provided with wrench).

Tighten the fxing nuts(1) locking the pump flange in the slot centre.

The gasket removed during pump disassembly shall not be utilised again.

Always use original spare parts.

On the timing side, throughout the specially appointed port, fit the washer and screw up the fixing nut(3) to the pump shaft. Lock the nut to the 90-95 Nm couple.
Partially loosen the screw (2) locking the pump shaft rotation and fit the slip washer(1). Tighten the screwfixing above said washer: this way the feed pump shaft is free to rotate.
Assemble the cover(2. Figure 101) including gasket and tighten the screws(I, Figure 10l).
Pull the pin outwards setting the camshaft gear free.

Disassemble the 380000988 tool locking flywheel rotation; place the starter in its housing Connect all pipelines (from pumping elements to injectors, bleeding recovery pipes from injectors to pump, LDA pipeline and feed provided by priming pump).

Connect electrical connections to electro-magnets on the hydraulic head and on KKSB.

In case pump removal has been carried out while the engine was assembled, connect acceleration cable.

 If you want to learn more about Heavy Duty Diagnostic Tools , welcome to contact with us: Service@autonumen.com , or you can check on our store: autonumen.com .Thanks!


2023年5月23日星期二

Difference between John Deere EDL v2 and new EDL v3

The John Deere diagnostic adapter for the diagnosis of special equipment and agricultural machinery John Deere and works in conjunction with the Service Advisor EDL (Electronic Data Link) software. The adapter allows you to diagnose construction and agricultural machinery, as well as John Deere engines. John Deere EDL v2/v3 drivers are built-in with the Service Advisor application.

Functions and technical capabilities of John Deere diagnostic adapter:
– Troubleshooting;
– Setup and Calibration ECU;
– Interactive tests;
– Computer programming;
– Diagnostic Code Reader, and much more.


what’s the main difference of the John Deere EDL v2 and the new EDL v3
Here are the improvements EDL V3 over the EDL V2
Improved USB connector utilizing automotive grade latching system
Increased memory RAM
Improved vehicle communications processor
Support of multiple 500K baud rate CAN Bus recordings
Longer range wireless connectivity
Improved Bluetooth connection speeds utilizing Bluetooth 2.1 with EDR (J1939 compliant)

If you want to know more information about Heavy Duty Diagnostic Tools ,please visit our website: https://www.autonumen.com .


2023年2月13日星期一

New Holland Electronic Service Tools compatible with CNH DPA5 suite of diagnostic tools


New Holland Electronic Service Tool Download:

https://mega.nz/#F!WVghzKwY!anc22uzd2t41QLiGgAt88Q


New Holland Electronic Service Tools DESCRIPTION

Electronic Service Tool (EST) Engineering Level* (software only) – used by New Holland dealer technicians to connect with vehicles that have a Controller Area Network (CAN) BUS.


Supported languages: English, Italian, Russian, Polish, Spanish, French, Portuguese, German, Dutch, Danish.

OS: VISTA,Win 8 x32 x 64, Win7 x32 x64, WinXP


With this service tool you can:

  • Check status of parameters;
  • Retrieve faults;
  • Run diagnostic tests;
  • Make ECU and parameter programming;
  • Monitor active and logged diagnostics;
  • View and change ECU configuration;
  • View diagnostic procedures and schematics.
  • Troubleshoot problems;
  • Use asist database;
  • Run scope diagnostics.


New Holland Electronic Service Tool Supported Brands:

New Holland (Agriculture and Construction);

New Holland FK (Fi at-Kobelco);

New Holland O&K (Orenstein & Koppel);

CASE (Agriculture and Construction);

STEYR;

KOBE-LCO;

Iveco (Astra) (articulated dump trucks only);

Flexi-Coil;

Sumitomo (S.H.I.)

 If you need more about the latest Heavy Duty Diagnostic , please visit our website : https://www.autonumen.com .

2023年2月8日星期三

JPRO Professional Truck Diagnostic Scan Tool FAQs

 Don’t see your question answered below? Contact us! Service@autonumen.com.

1.What does JPRO do?
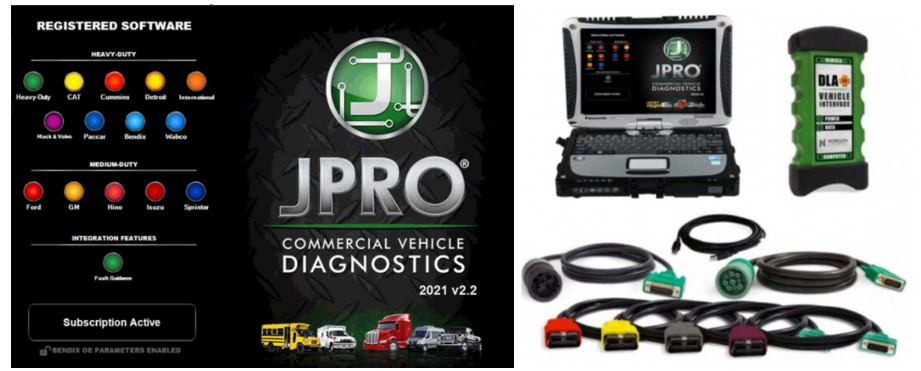
JPRO empowers diesel technicians to diagnose and repair all makes, models, and components. JPRO reduces a technician’s dependency on OEM software by offering industry-leading bi-directional controls, including DPF regens, cylinder cutouts, parameter changes, and much more.

2.What trucks will JPRO work on?
For commercial vehicles, JPRO is an all makes, models, and components solutions. For detailed information, check out our coverage chart.

3.Can JPRO adjust parameters such as road speeds or idle shutdown settings?
Yes! JPRO allows for many parameter adjustments, including max road and cruise speeds, idle shutdown, PTO, VSS, Trip Information, and more! Coverage varies by manufacturer, so please visit our coverage chart for complete details.

4.What adapters work with JPRO?
For the most reliable connection and functionality, we recommend a Noregon DLA+ 2.0 adapter but any RP1210C compliant adapter should work with JPRO.

5.If I buy JPRO, do I need anything else?
JPRO software requires a compatible Windows based PC, laptop, or tablet, RP1210C compliant adapter, and the appropriate cable that connects the computer to the vehicle’s OBD-II, 9-pin, or 6-pin port.

PLEASE NOTE: JPRO’s HD support for Mack and Volvo only supports the following adapters: • Noregon DLA+, DLA+ Wireless, DLA+ 2.0, DLA+ 2.0 Wireless, and DLA+ PLC • Vocom 88890300NEXIQ USB-Link, USB-Link 2

PLEASE NOTE: Ford, GM, Isuzu or Sprinter mediud-duty vehicle require any of the following adapters for connection: Noregon DLA+, DLA+ Wireless, DLA+ 2.0, DLA+ 2.0 Wireless

6. Do I need internet access for JPRO?
An internet connection is not necessary for connecting to the vehicle, or for using many features in JPRO, but certain tools like Fault Guidance and NextStep Repair require an active connection. Additionally, setup, updates, license verification, or submission of information to third-party warranty systems require internet access.

7. Can JPRO perform bi-directional vehicle tests?
Yes! JPRO comes loaded with industry-leading bi-directional tests for the makes and models you commonly repair. For a full list of included tests, visit our coverage chart.

8. Can JPRO perform ECU programming?
Due to security and safety concerns, JPRO does not allow users to reprogram ECUs.

9.Does JPRO support OBDII?
Yes.

10. What kind of computer and operating system do I need to run JPRO?
Supported Operating Systems:
Windows 8 and 8.1 Pro (32 or 64 bit English, 32 bit Spanish)
Windows 10 (32 or 64 bit English, 32 bit Spanish)
Hardware Requirements:
Minimum: 4GB RAM, 20 GB of available hard drive space, Intel Core i3 processor, and 1024×768 sized monitor
Recommended: 8GB RAM, 20 GB of available hard drive space, Intel Core i5 processor
USB port for Noregon DLA+ or DLA+ 2.0 adapter
Noregon recommends using a Panasonic Toughbook, but JPRO will work on any current PC running Windows 8 or Windows 10

11.Does JPRO work internationally?
JPRO is designed to work on vehicle utilizing communication protocols used in North American manufacturing standards. These protocols include:

Support for heavy-duty SAE J1587/J1708, J1939, ISO 15765, and KWP2000 messages
Support for reading and display of HD-OBD Emissions faults in standard fault display
Medium Duty support for reading emissions faults and data from all standard US OBD vehicles since 2007
Support for medium-duty ISO 15765, IS 14229, J1850, GMLAN (CAN-based), and KWP2000 (CAN-based) messages
If you have other questions or you want to purchase the JPRO, please log in our website and contact the sellers: https://www.autonumen.com/goods-7190-JPRO-Professional-Truck-Diagnostic-Scan-Toolbox-Plus-lenovo-T420-laptop.html .

2022年10月17日星期一

Top 5 Reasons to Get VXSCAN T8 Diesel Diagnostic Tool


http://www.autonumen.com/images/201504/goods_img/5012_P_1429781549153.jpg

Top 5 Reasons to Get VXSCAN T8 diesel diagnostic tool:
1. Quick communication with the most vehicle system
2. Intergrated conncetor for all Can Bus systems
3. High resolution VGA color with 8-inch super TFE LCD touch screen
4. Intergrated high speed thermal printer
5. 12 Months warranty with 1 Year software online update

The Original VXSCAN T8 Diesel Diagnostic Tool software configuration is all-round, vehicle model data and materials are complete. It fully meets the customers’ strict requirements of the inspection breadth and depth. The software covers tens of thousands of kinds of vehicle model data, and provides strong repair material help systems to allow Heavy Duty Diagnostic users  to easily deal with problems  in practical work so as to improve work efficiency and technical level.

The appearance design is luxury and comfortable with the large TFT touch screen  display  for  operations;  the mode  setup function  for multi working  conditions can  satisfy the working  demands in different environments. The VXSCAN T8 automobile fault diagnostic computer which adopts the flexible drive technology has good scalability, and it fully meets requirements of various communication bus tests for current automobile electronic control systems.

2022年10月15日星期六

how to remove and install turbocharger assembly for JCB HP 2010 with ISUZU INT-Tier4 engine

This instruction show you guide on how to remove and install turbocharger assembly for JCB HP 2010 with ISUZU INT-Tier4 engine.

Removal Guide:

1 Battery Ground Cable Disconnect

Disconnect the battery ground cable from the battery.

Caution: Do not disconnect the battery cable for 1 minute after turning OFF the ignition switch.


2 Coolant Drain

Drain the coolant from the radiator.

Caution: After the coolant is discharged, make sure to tighten the drain plug.


3 Turbocharger Assembly Removal

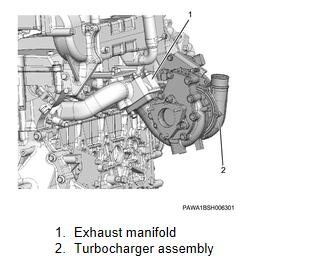
Remove the air cleaner duct from the air cleaner assembly and the turbocharger assembly.

Remove the air intake hose from the turbocharger assembly and the intercooler.

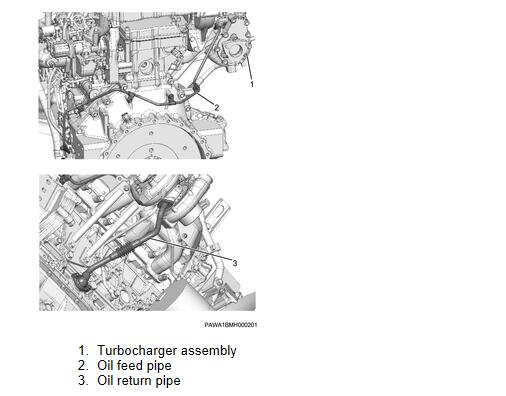
Remove the exhaust pipe from the turbocharger assembly.is connect the oil feed pipe from the turbocharger assembly.

Note: Remove the clip.

Disconnect the oil return pipe from the turbocharger assembly.

Disconnect the water return pipe from the turbocharger assembly.

Disconnect the water feed pipe from the turbocharger assembly.

Note: Remove the clip.

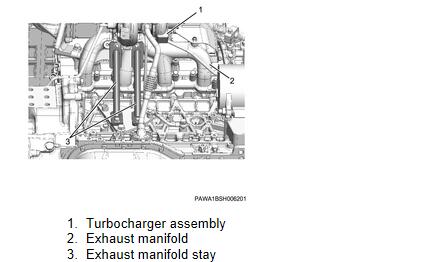
Remove the exhaust manifold stay from the cylinder block and the turbocharger assembly.

Disconnect the harness connector from the turbocharger assembly.

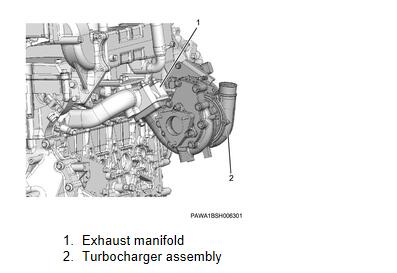
Remove the turbocharger assembly from the exhaust manifold.


Installation Guide:

Temporarily tighten the turbocharger assembly to the exhaust manifold.

Temporarily tighten the exhaust manifold stay to the cylinder block and the turbocharger assembly.

Securely tighten the turbocharger assembly to the exhaust manifold.

tightening torque: 52 N・m { 5.3 kgf・m / 38 lb・ft }

Securely tighten the exhaust manifold stay to the cylinder block and the turbocharger assembly.

tightening torque: 52 N・m { 5.3 kgf・m / 38 lb・ft } Nut

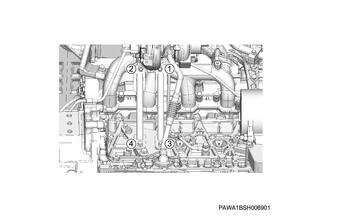
tightening torque: 50 N・m { 5.1 kgf・m / 37 lb・ft } Bolt

Note: Tightening order

Connect the water feed pipe to the turbocharger assembly.

Caution: Use new gaskets.

tightening torque: 35 N・m { 3.5 kgf・m / 25 lb・ft } Eyebolt

tightening torque: 14 N・m { 1.4 kgf・m / 119 lb・in } Clip

Connect the water return pipe to the turbocharger assembly.

tightening torque: 35 N・m { 3.5 kgf・m / 25 lb・ft } Eyebolt

Connect the oil return pipe to the turbocharger assembly.

Caution: Use new gaskets.

tightening torque: 9 N・m { 0.9 kgf・m / 78 lb・in }

Replenish the turbocharger assembly with the engine oil.

Connect the oil feed pipe to the turbocharger assembly.

Caution: Use new gaskets.

tightening torque: 29 N・m { 3.0 kgf・m / 21 lb・ft } Eyebolt

tightening torque: 24 N・m { 2.4 kgf・m / 17 lb・ft } Clip

Install the exhaust pipe to the turbocharger assembly.

Install the air intake hose to the turbocharger assembly and the intercooler.

Install the air cleaner duct to the air cleaner assembly and the turbocharger assembly.

Connect the harness connector to the turbocharger assembly.


Coolant Filling

Loosen the valve using a wrench.

Replenish the coolant with the radiator.

Caution: Be careful not to let coolant overflow splash on the exhaust system parts.

Caution: Coolant overflow should be wiped off.

Tighten the valve using a wrench.

Caution: Use new gaskets.

tightening torque: 28 N・m { 2.8 kgf・m / 20 lb・ft }

Replenish the coolant with the radiator.


Battery Ground Cable Connect

Connect the battery ground cable to the battery.

More repair cases for ISUZU engine,please refer to:ISUZU Engine Trouble Repair

More repair tool for ISUZU engine,please refer to: JCB Electronic Service tool

2022年2月10日星期四

John Deere Service Consultant 5.2.554 Offline 2020 Construction & Forestry Equipment


Important Notice. Installation and activation are possible only with remote assistance using Teamviewer.

The laptops with ARM CPUs(Snapdragon 8cx, Microsft SQ1, etc) type are not supported!

The installation of AG and CF on the same Laptop is possible. Please let us know if you need to install Agriculture and Construction versions of the Service Advisor on the same PC before we process the order.

You are buying John Deere Service Advisor V5.2 for Construction and Forestry equipment online on USB HDD with international delivery or easy digital download! If you want to download the program. The download link along with PDF instruction file emailed to your email address within 2 hours (up to 12 hours in a weekend) of your purchase. If you would like the same software shipped to you on a USB HDD please select the appropriate delivery method during checkout.

The John Deere Service Advisor combines several versions of the program. As well as a number of related programs and diagnostic equipment

For Agriculture division please check the John Deere Service Advisor 5.2 2020 Agriculture Equipment Division product link

Before you proceed, please check the product requirements below.

EDL V2 Diagnostic Kit System requirements:
– O.S.: Windows 7 Pro/Ultimate; Windows 8 Pro, Windows 8.1 Pro, Windows 10 Pro/Home
– CPU: Any CPU for Windows platform
– RAM: 8 GB of system memory (Recommended), 4 GB is the minimum required amount.
– Hard Drive: 150 GB of available space + ~110 Gb for the setup files if you want to download the software.

JD Service Advisor v5.2 support only Genuine JD EDL V3/V2 DLA Adapter kit (The previous version V2 USB and BT is also supported). If you’re using any other diagnostics tool we do not make any warranties

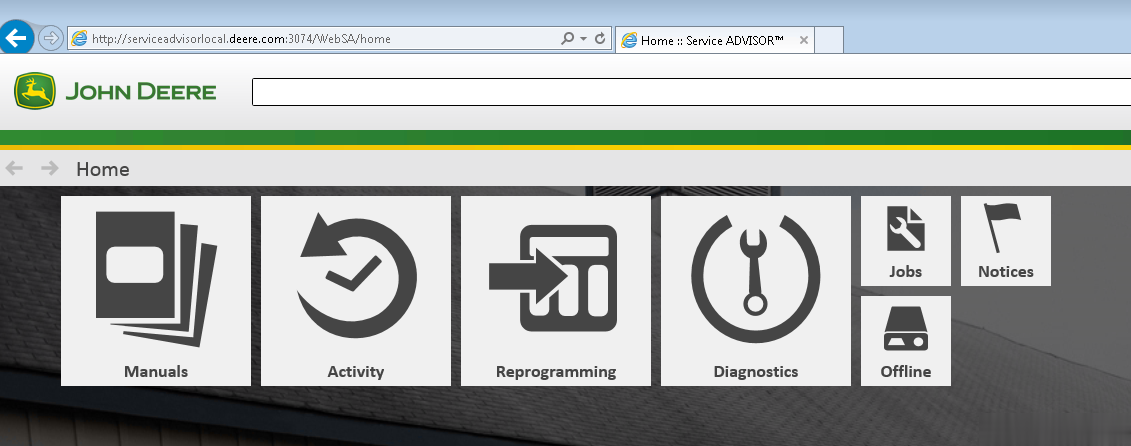
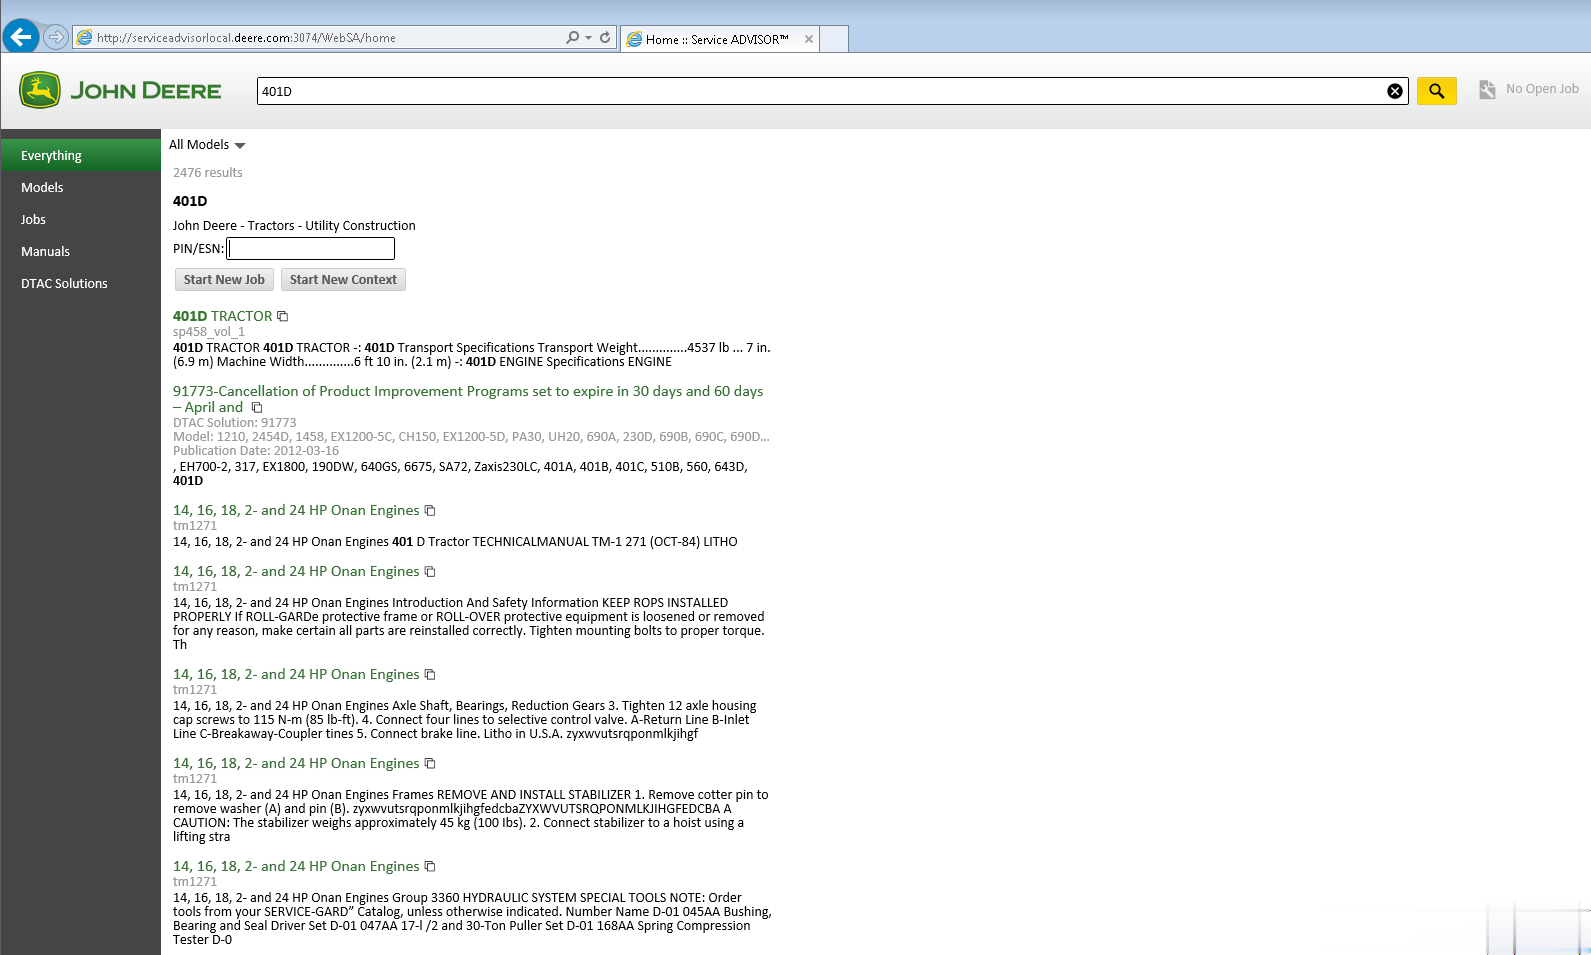
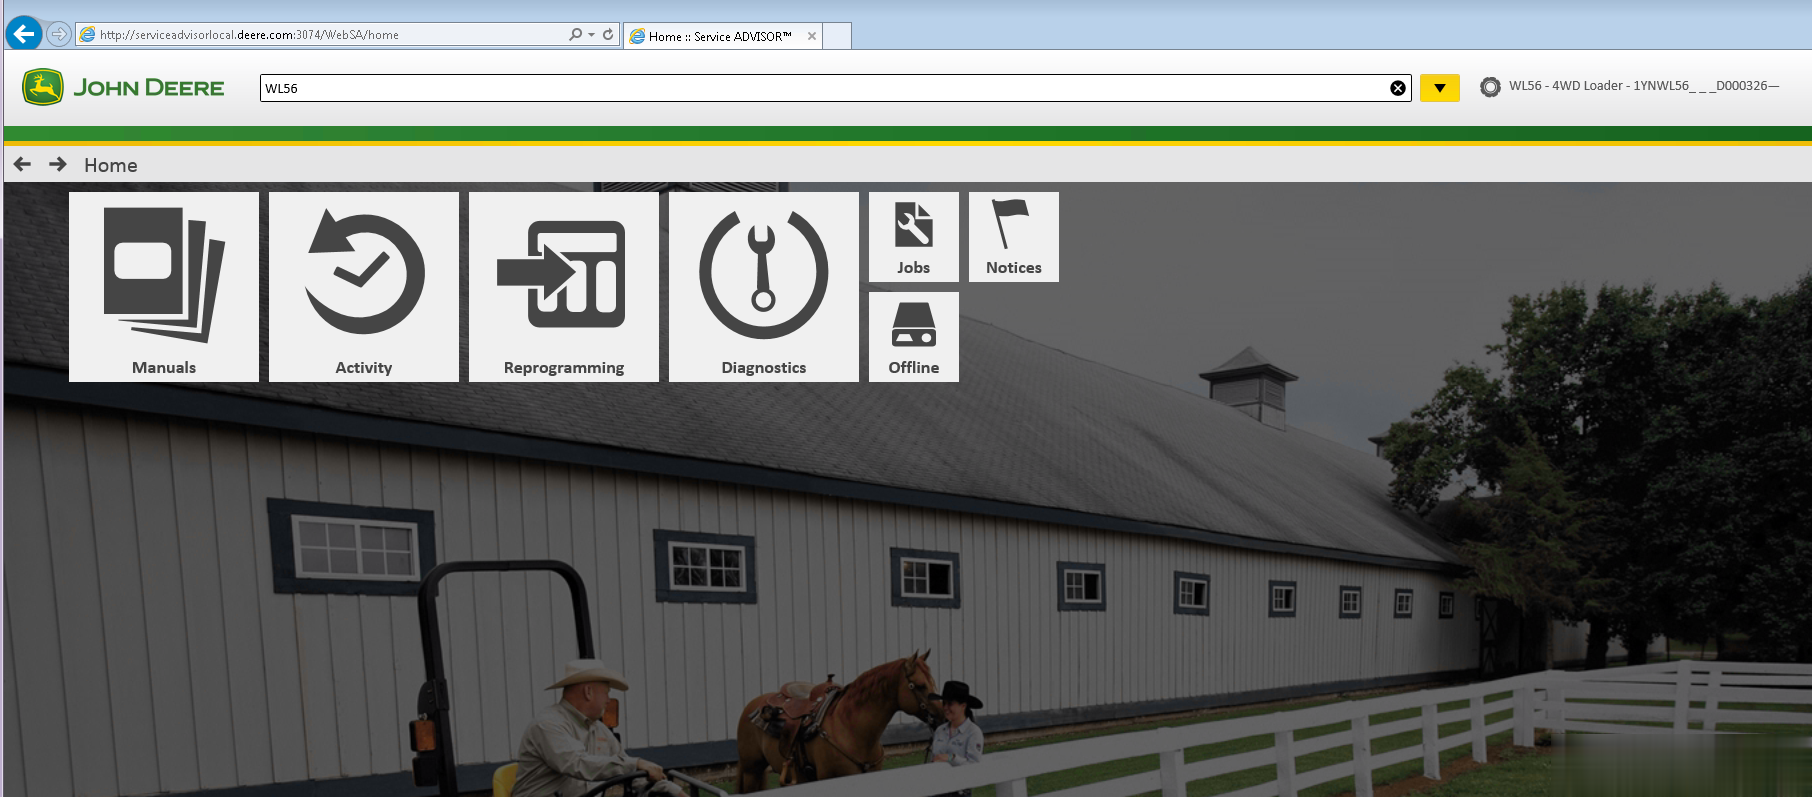
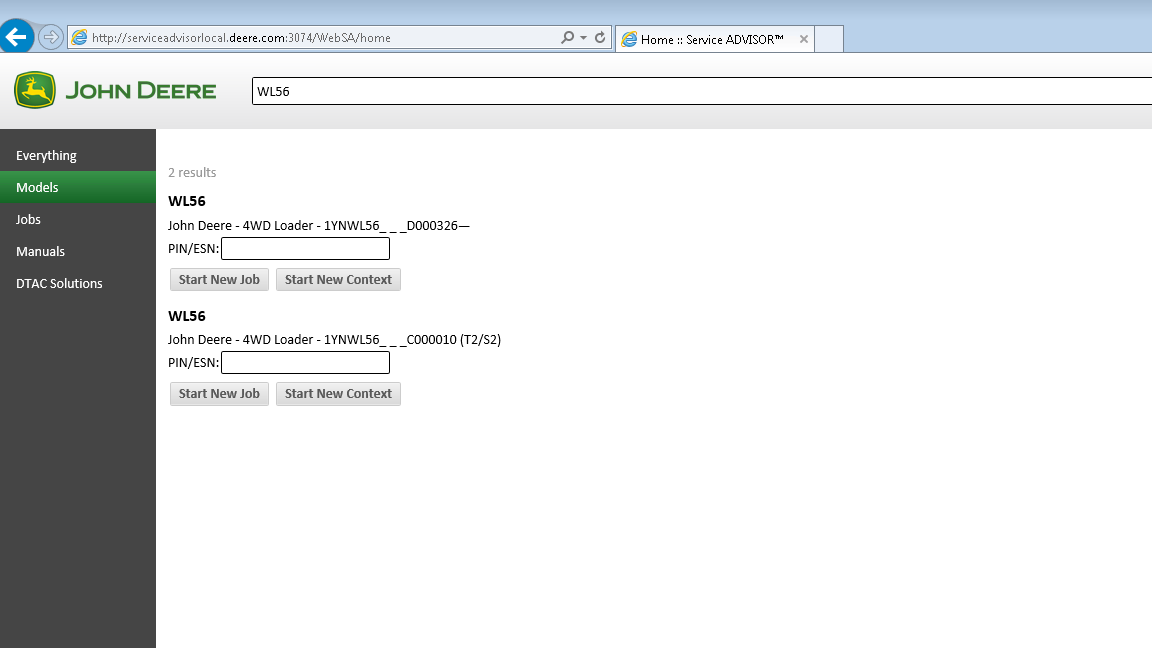
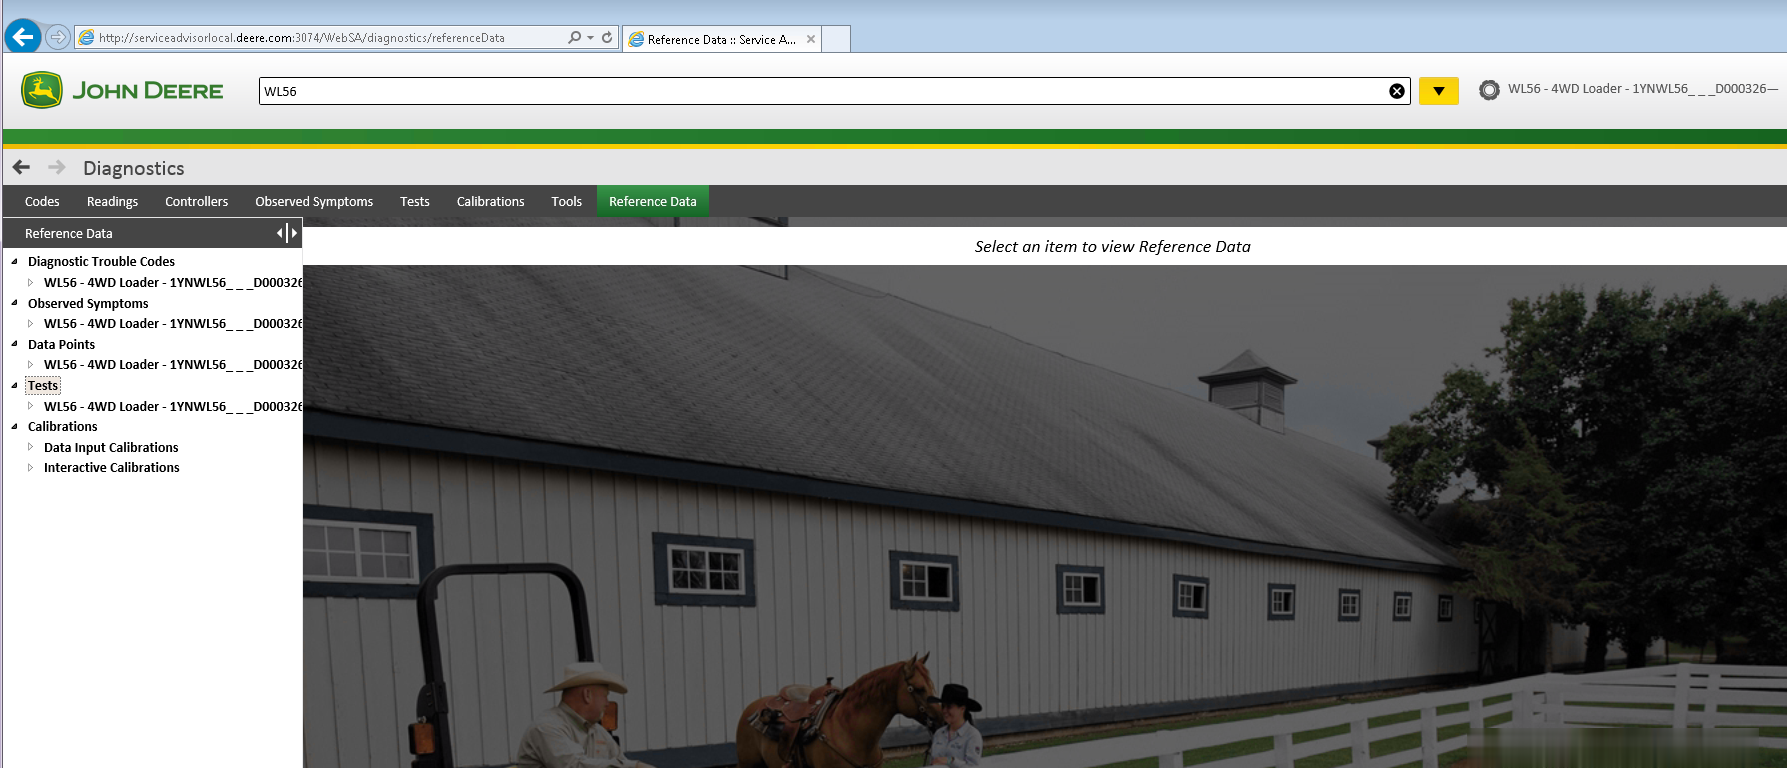
The new version of Service Advisor comes as a complete solution for those who do a repair, diagnostics, and maintenance of all John Deere construction and forestry equipment. It’s completely different from its previous version 4.2. JD Service Advisor functions are available from the Internet Explorer Web browser. At this moment this is only one officially supported browser version. To start work with any model, you need to enter the model name or its PIN.

Available program futures divided into a few main sections: – Manuals – Reprogramming – Diagnostics

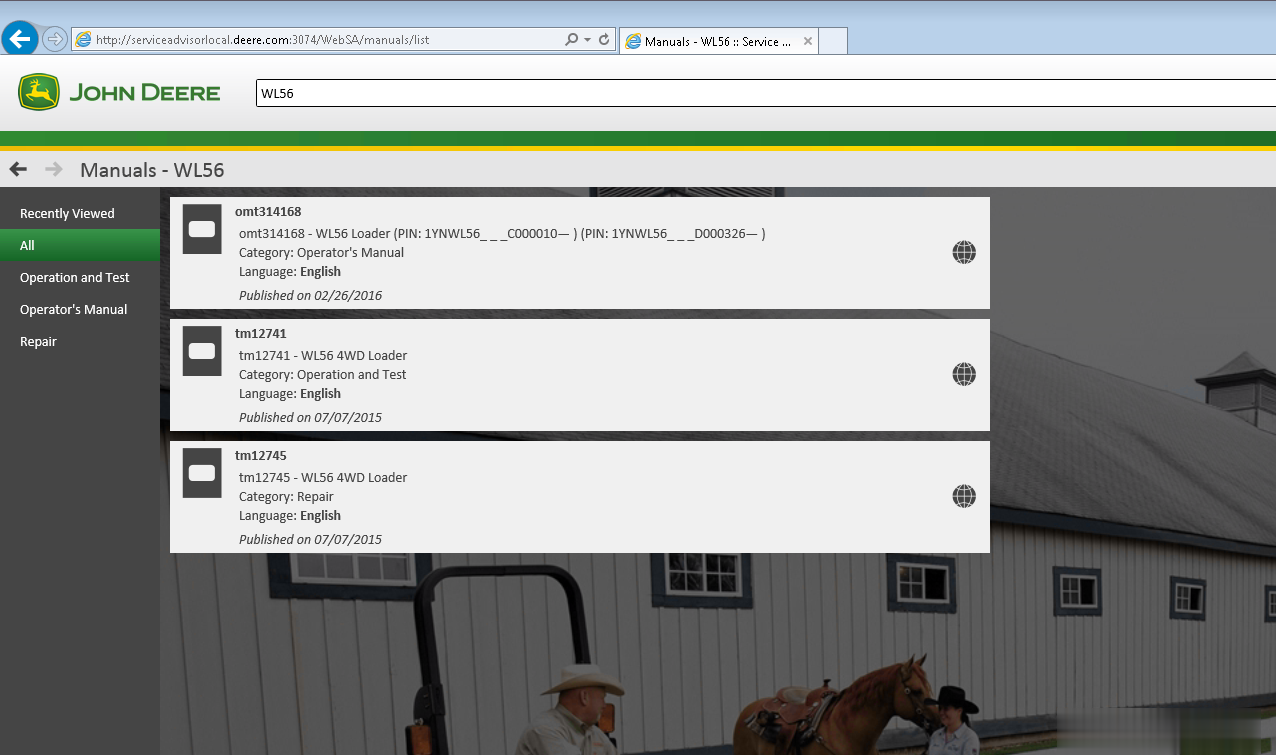
Manuals Section. First of all, most of the manuals now have a more convenient web interface and you can read/print all you want using Internet Explorer. A part of the manual is still available as pdf files only. So you need Adobe Reader installed.

The reprogramming section requires dealer credentials to access the payload database. At this moment this future is not available.

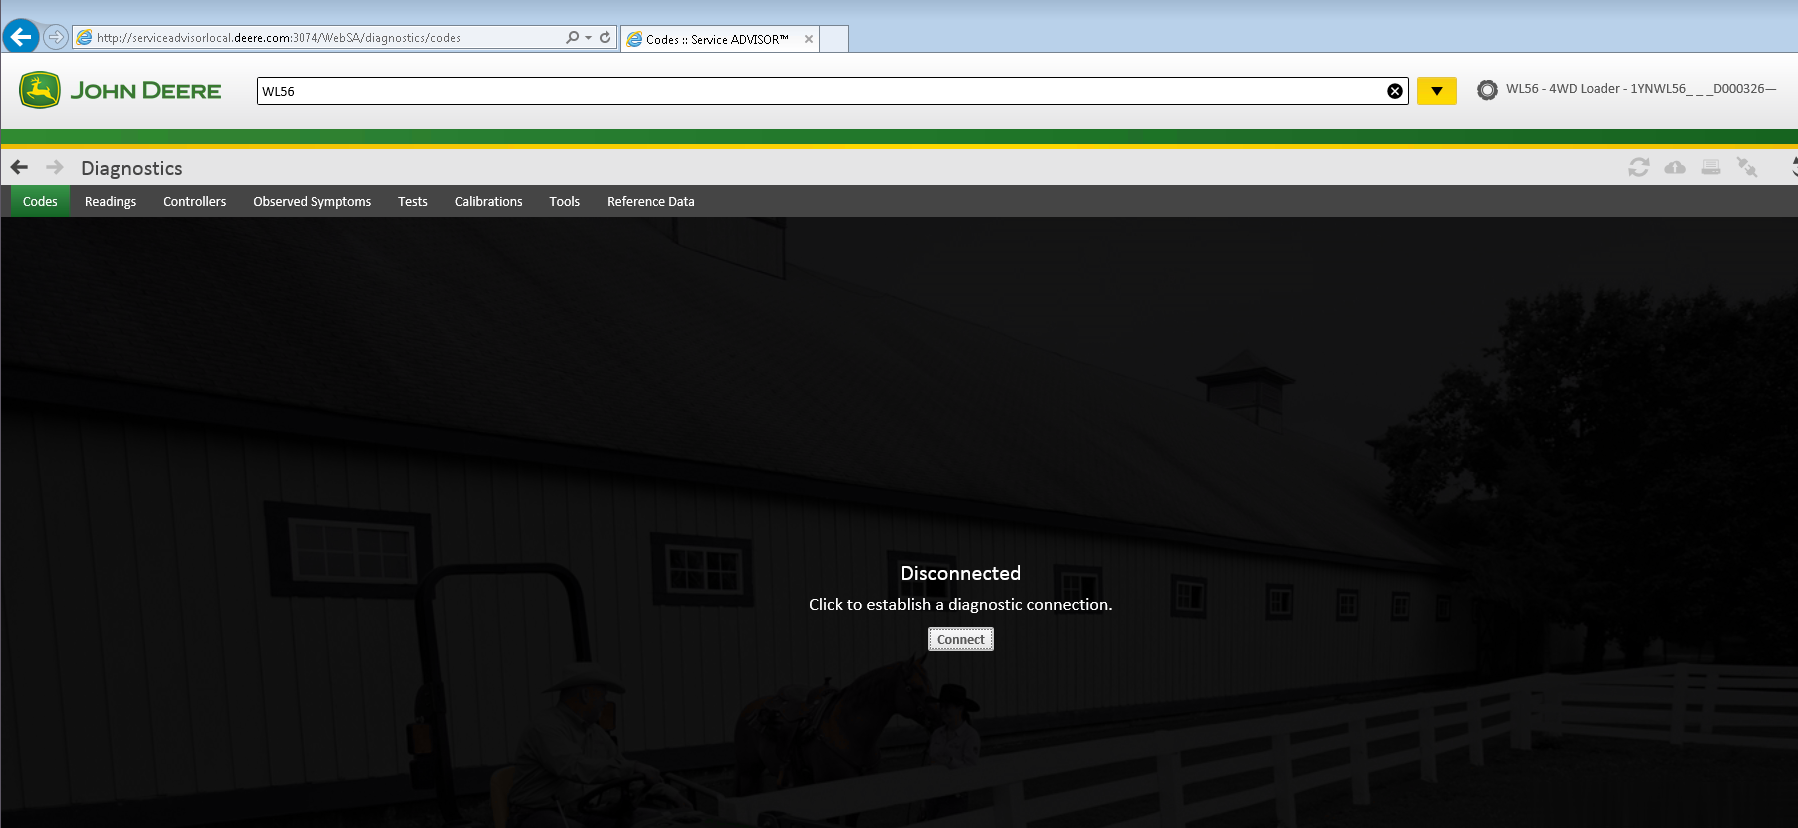
Diagnostics section. The avaiable menus are

– Codes – Readings – Controllers – Observed Symptoms – Tests – Calibrations

John Deere Service Advisor 5.2 covers:

Hint: Click show all

4WD Loader:
ADT:
AG:
Alternate:
Attachment:
Apollo Series:
Axles:
Backhoe:
Boom Harvester:
Bundler:
CF Management Solutions:
Communication:
Compact Excavator:
Compact Loader:
Compactor:
Crawler:
Delimber:
Excavators:
Feller Buncher:
Felling Head:
Forestry Swing Machine:
Forklift:
Forwarder:
Harvester:
Harvester Head:
Information:
JD Hand-Held Portable Products:
Landscape Loader:
Landscaping:
Loader:
Log Loader:
Logger:
Mate. Hand Cut. and Shredders:
Measuring System:
Motor Grader:
OEM Engines:
OEM Winch:
Other:
Planetary Drive:
PTO:
Pump Drive:
Scraper:
Shovel Logger:
Skid Steer:
Skidder:
Software:
Telematics:
Tracked Harvester:
Tractor Loader:
Tractors:
Transmission:
Truck:
Utility Vehicles:
Wheeled Harvester:
Winch:
Worksite Pro Attachment:
john-deere-service-advisor-5.2-2017-construction-and-foresty-equipment-1-2 john-deere-service-advisor-5.2-2017-construction-and-foresty-equipment-2-2 john-deere-service-advisor-5.2-2017-construction-and-foresty-equipment-3-2 john-deere-service-advisor-5.2-2017-construction-and-foresty-equipment-4-2 john-deere-service-advisor-5.2-2017-construction-and-foresty-equipment-5-2 john-deere-service-advisor-5.2-2017-construction-and-foresty-equipment-6-2 john-deere-service-advisor-5.2-2017-construction-and-foresty-equipment-7-2 john-deere-service-advisor-5.2-2017-construction-and-foresty-equipment-8-2

2022年2月9日星期三

How to Change the John Deere Speed Limit Using the PLD File Editor


John Deere PayLoad (PLD) File Editor – this is Developer level tool, that allows you to change factory parameters in the PLD files using John Deere Service Advisor.

Example: How to change speed limit with  pld files?

Q1:Question about payload files:

I have pld files of my tractor (6330P) 11 in total.
I see in bottom of each files info about my tractor (option, serial number etc)
Question: My goal is up the speed limit from 40km to 50 km. I think I have to change OPTION=3 to OPTION=5, but do I have to edit each 11 pld file?
A1:You were right about the speed limit:
you can change OPTION=3 to OPTION=4 or any other you need.
Speed_30kmh = 1;
Speed_35kmh = 2;
Speed_40kmh = 3;
Speed_50kmh = 4;
Speed_ECO = 5;
Speed_NoiseRed_OOS = 6;

For R models the line is different. ROADSPEEDLIMIT=3 change to ROADSPEEDLIMIT=5 or any other you need.

var RoadSpeedLimit_30 = “1”;
var RoadSpeedLimit_35 = “2”;
var RoadSpeedLimit_3840 = “3”;
var RoadSpeedLimit_40E = “4”;
var RoadSpeedLimit_50 = “5”;
var RoadSpeedLimit_50E = “6”;
var RoadSpeedLimit_55 = “7”;
var RoadSpeedLimit_60 = “8”;
var RoadSpeedLimit_60E = “9”;

After you change it, sometimes you still need to lift the speed manually through the display (depending on the tractor model)

You only need to reprogram transmission controller for that.
If you reprogrammed all of them, some settings might have went to default so you might get up to 5 fault codes that you need to configure with SA.

Q2:Does it work with SA 4.2?
A2:Service Advisor is just a tool to use pld. Pld editor works without SA.

Q3:I have a question about trying to up the power of a 6330 to a 6430. If I compare the engine pld of both tractor they are identical (just the info in the bottom is different) So I don’t know how it could up the power if all the code is the same??
A3:most pld files are made for various models, the info at the bottom determines which part of the pld file will be used for programming. For example:
PRODUCT_MODEL_NO=6115
PERFORMANCE_OPTION_PART_NO=R546973
FACTORY_OPTIONS=RE570443

Q4: Do you have john deere edl v3 PLD file editor for sale?
A4: Sorry, we don’t have PLD files. You can search or download from google.